
pythonでデスクトップアプリ開発
これまでに受託開発で培ったノウハウです。
大手仕事依頼サイトでの受託開発
日本最大級のクラウド・ソーシングを提供するサービス(仕事依頼サイト)で、受託開発してます。
依頼主様の業務で発生す繰り返し作業を補助するニッチなデスクトップアプリの作成した際の記録です。
家電量販店などで売っているパッケージ商品だと、数万円で多機能なツールを購入できますが、
ピンポイントな作業の補助ツールになるため、どうしても割高になります。
ただ、時給1000円のアルバイトを雇って、1回30分の作業を、1日1回、営業日で1か月繰り返せば、
1000(円/1時間) * 0.5時間 * 20回 = 1万円になります。
そう考えると。人件費を削減でき、ツールにすることで、
ミスも軽減できるため、メリットは多いため発注する方は多いようです。
開発期間と金額
これまでの開発実績です。
| 依頼内容 | 期間 | 金額 |
|---|---|---|
| NOTEの自動フォロー | 1か月 | 30000円 ~ 40000円 |
| クリックポストの支払い手続きを一括でまとめてできるツール | 1か月 | 10000円 ~ 20000円 |
| ページを監視し、変化があったら通知をしてくれるツール | 1か月 | 20000円 ~ 30000円 |
pythonでデスクトップアプリを開発した際のノウハウ
アプリケーションを作成する際に工夫した点です。特に、全てのツールで共通的に適用した内容を記載しております。
ここに記載していないことで、知りたいことがあれば、問い合わせフォームなどでご連絡頂ければ、分かる範囲でご回答します。
docker環境
Dockerでは、必要なミドルウェアやアプリケーションに応じて、さまざまなDockerイメージが準備され、利用できます。
開発作業では独自の環境を構築する必要があるため、開発ツール毎に環境を用意してあげないと、
pythonやライブラリのバージョン管理が出来なくなります。
もはやDockerなしでの開発は難しく、アプリケーション開発では必須の知識になります。
ただ、デスクトップアプリ開発ならではの問題があります。
ローカル端末(開発に使ってるPC)がWindows環境なので、LinuxのDockerで作成したGUIが確認ができないです。
そのため、Windowsで動作するXサーバー(X Server)であるVcXsrvを導入して、GUIを確認できるようにします。
インストールと軌道ははりんか ネットさんのサイトが分かりやすいです。
Xサーバを導入するまでは、毎回exe化して確認をしており、1回のビルドには5分くらい掛かっていたたため、私はこれで、かなり開発効率を挙げることができました。
Dockerfile
Dockerfileのポイントは、
- RUN apt-get install xterm -y
です。これでDocker上にxtermをインストールし、windows環境と繋がるようにします。
FROM python:3
USER root

RUN apt-get update && apt-get install -y unzip

# GUIのため
RUN apt-get install xterm -y

#日本語対応
RUN apt-get install -y locales \
    && locale-gen ja_JP.UTF-8 \
    && echo "export LANG=ja_JP.UTF-8" >> ~/.bashrc
RUN apt-get install fonts-ipafont -y

# Japanese Localization
RUN cp /usr/share/zoneinfo/Asia/Tokyo /etc/localtime

# setup directory
RUN mkdir /app
ADD . /app
WORKDIR /app

RUN python -m pip install -r requirements.txt
docker-compose.yaml
docker-compose.yamlのポイントは、
- environment:
- DISPLAY=host.docker.internal:0.0
- extra_hosts:
- “host.docker.internal:host-gateway”
これでDockerと、windows環境と繋がるようにします。
version: '3'
services:
  python3:
    restart: always
    build: .
    container_name: 'XXXXXXXXX'
    working_dir: '/app'
    tty: true
    volumes:
      - ./app:/app
    environment:
      - DISPLAY=host.docker.internal:0.0
    extra_hosts:
      - "host.docker.internal:host-gateway"
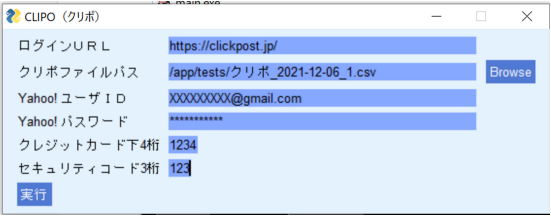
UI作成
補助ツールの開発では、そこまで凝ったレイアウトや入力項目は求められません。
そのため「PySimpleGUI」を使って画面レイアウトを作成します。
抜粋になりますが、以下のコードを記載するだけで簡単に画面を作成出来ます。
# coding: utf-8
import PySimpleGUI as sg

 clipo_url = 'https://clickpost.jp/'
 waclipo_dirpathit = ''
 yahoo_userid =''
 yahoo_passward = ''
 credit_card_last_digits = '1234'
 security_code = '123'

  #メイン
  width=20
  main_layout = [
    [sg.Text(u"ログインURL",size=(width,1)), sg.InputText(clipo_url,key="clipo_url")],
    [sg.Text(u"クリポファイルパス",size=(width,1)), sg.InputText(waclipo_dirpathit,key="clipo_dirpath"), sg.FileBrowse(key="file")],
    [sg.Text(u'Yahoo! ユーザID',size=(width,1)),sg.InputText(yahoo_userid,key='yahoo_userid')],
    [sg.Text(u'Yahoo! パスワード',size=(width,1)),sg.InputText(yahoo_passward,key='yahoo_passward',password_char="*", )],
    [sg.Text(u'クレジットカード下4桁',size=(width,1)), sg.InputText(credit_card_last_digits,key='credit_card_last_digits' ,size=(4,1))],
    [sg.Text(u'セキュリティコード3桁',size=(width,1)), sg.InputText(security_code,key='security_code' ,size=(3,1))],
    [sg.Submit(button_text=u'実行')]
  ]

  layout = main_layout

#------------------------------------------------------
# ウィンドウを表示する関数
#------------------------------------------------------
def show_window():
  win = sg.Window('CLIPO(クリポ)', layout)

#------------------------------------------------------
# 画面表示
#------------------------------------------------------
#GUI実行
show_window()
アプリケーションの実行ログ
アプリケーションの動作確認を行う上で、ログの出力は必要不可欠です。
特に、予期せぬ動きをした際の原因調査では必須になります。
そのため、あらかじめログ出力を共通化しておくことで、デバッグ作業を効率化できます。
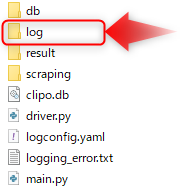
logフォルダには、以下のファイルを格納します。

ログを出力したい箇所で、下記のように記載するとログが出力されます。
import log.logger as logger

try:

  #ログ機能
  log = logger.Logger()
  log.info(logger.Trace.execution_location(), '初期化処理')

except Exception as e:
  log.error(logger.Trace.execution_location(), '初期化実行エラー')
  log.error(logger.Trace.execution_location(), e)
  log.error(logger.Trace.execution_location(), e.reason)
  sg.popup('初期化実行エラー:app.logを確認してください。')
依頼主の方から、ツールが思ったように動かないと言われた際は、このログファイルを送ってもらうことで、調査を進めることが出来ます。
実際のコードは以下の通りです。
logger.py
import logging
import inspect
import os
import logging.config
import yaml  # conda install pyyaml
import time

class Logger():
    """
    ログ出力用クラス
    """
    def __init__(self):
        try:
            #self.logger = logging.basicConfig(level=logging.DEBUG, filename="app.log", format="[%(asctime)s] [%(process)d] [%(name)s] [%(levelname)s] %(message)s")
            os.makedirs('./log', exist_ok=True)

            self.logger = logging.config.dictConfig(yaml.safe_load(open('logconfig.yaml').read()))
        except Exception as e:
            f = open('logging_error.txt', 'w')
            f.write(time.strftime('%Y/%m/%d %H:%M:%S')+' LOGGING SETTING LOAD...NG!!')
            f.write(e.message)
            f.close()

    def debug(self, execution_location, log_message):
        self.logger = logging.getLogger(execution_location)
        self.logger.debug(log_message)

    def info(self, execution_location, log_message):
        self.logger = logging.getLogger(execution_location)
        self.logger.info(log_message)

    def warning(self, execution_location, log_message):
        self.logger = logging.getLogger(execution_location)
        self.logger.warning(log_message)

    def error(self, execution_location, log_message):
        self.logger = logging.getLogger(execution_location)
        self.logger.error(log_message)

class Trace():
    """
    ログ出力とセットで使う処理をまとめたクラス
    """
    @classmethod
    def execution_location(self):
        """
        処理の実行場所を出力する。[ファイル名: 行番号  メソッド名]
        """
        frame = inspect.currentframe().f_back
        return "{}:{} {}".format(os.path.basename(frame.f_code.co_filename), frame.f_lineno, frame.f_code.co_name)

def test_method():
    log = Logger()
    log.info(Trace.execution_location(),'LOGGING SETTING LOAD...OK!!')

test_method()
logconfig.yaml
version: 1
formatters:
  simple:
    format: "[%(asctime)s] [%(process)d] [%(name)s] [%(levelname)s] %(message)s"
handlers:
  console:
    class: logging.StreamHandler
    level: DEBUG
    formatter: simple
    stream: ext://sys.stdout
  file:
    class: logging.handlers.RotatingFileHandler
    level: DEBUG
    formatter: simple
    filename: log/app.log
    maxBytes: 10000
    backupCount: 10
loggers:
  simpleExample:
    level: DEBUG
    handlers: [file]
    propagate: no
root:
  level: DEBUG
  handlers: [file]
DB(SQLite3)の利用
DBへのデータ格納も、多くのアプリケーションで必要になります。そのため、簡単なHelper関数を用意します。
簡単なデスクトップアプリは、ファイルにデータを保存できる「SQLite3」と相性が良いためおすすめします。
私は以下のサイトを参考にさせて頂きDB接続ヘルパーを作成しています。
【コピペで完了】9割の機能を網羅!PytonからSQLiteを扱うクラスを作ってみました。
業務補助ツールであれば、そこまでステップ数の多いSQLを書くことはないので、直書きでも対応可能です。
もっと機能数が多く、規模が増える場合は、mapperなどを自動生成できるフレームワークを導入することをおすすめします。

localdb.py
import sqlite3

class LocalCache:
    '''
    SQLiteのヘルパークラス

    Parameters
    ----------
    filename : str
        SQLiteのデータベースファイルへのパス

    '''

    def __init__(self,dbname):
        self.dbname = dbname

    def execute(self,sql):
        '''
        SQLを実行し、結果を取得する

        Parameters
        ----------
        columns : str
            実行したいSQL
        '''
        conn = sqlite3.connect(self.dbname)
        cur = conn.cursor()
        cur.execute(sql)
        conn.commit()
        cur.close()
        conn.close()

    def execute_all(self,sqls):
        '''
        複数のSQLをトランザクション配下で実行する

        Parameters
        ----------
        columns : strs
            実行したいSQLのリスト
        '''
        conn = sqlite3.connect(self.dbname)
        cur = conn.cursor()
        try:
            for sql in sqls:
                cur.execute(sql)
            conn.commit()
        except sqlite3.Error as e:
            conn.rollback()

        cur.close()
        conn.close()

    def execute_query(self,sql):
        '''
        select 系のSQLを実行し、結果を全て取得する

        Parameters
        ----------
        columns : str
            実行したいSQL

        Returns
        ----------
        data: list
            1行分をタプルとし、複数行をリストとして返す
            <例> [('RX100','Sony',35000),('RX200','Sony',42000)]
        '''
        conn = sqlite3.connect(self.dbname)
        cur = conn.cursor()
        cur.execute(sql)
        res = cur.fetchall()
        cur.close()
        conn.close()
        return res

    def execute_scalor(self,sql):
        '''
        結果の値が1つしかないSQLを実行し、結果を取得する

        Parameters
        ----------
        columns : str
            実行したいSQL

        Returns
        ----------
        res:
            実行結果により返された値
        '''
        conn = sqlite3.connect(self.dbname)
        cur = conn.cursor()
        cur.execute(sql)
        res = cur.fetchone()
        cur.close()
        conn.close()
        return res[0] if res != None else None

    def create(self,tablename,columns,primarykey = '',isdrop=False):
        '''
        テーブルを作成する

        Parameters
        ----------
        columns : str
            「列名」又は「列名+型」をカンマ区切りで指定
            <例> 'product text,price int,maker,year'
        primarykey: str
            プライマリーキーをカンマ区切りで指定
            <例> 'product,year'
        '''
        if isdrop :
            self.drop(tablename)

        pkey = ',primary key({0})'.format(primarykey) if primarykey != '' else ''
        sql = 'create table {0}({1} {2})'.format(tablename,columns,pkey)
        self.execute(sql)

    def drop(self,tablename):
        '''
        指定されたテーブルが存在すれば削除、無ければ何もしない

        Parameters
        ----------
        tablename : str
            削除したいテーブル名
        '''
        self.execute("drop table if exists {0}".format(tablename))

    def exists(self,tablename):
        '''
        指定したテーブル、又はビューの有無を判定する

        Parameters
        ----------
        columns : str
            実行したいSQL
        Returns
        ----------
            テーブル又はビューが存在すればTrue 存在しなければ False
        '''
        res = self.execute_scalor("select count(*) from sqlite_master where name='{0}'".format(tablename))
        return True if res > 0 else False

    def rename(self,old_tablename,new_tablename):
        '''
        テーブル名を変更する

        Parameters
        ----------
        old_tablename : str
            変更前のテーブル名
        new_tablename : str
            変更後のテーブル名
        '''
        self.execute_query("alter table {0} rename to {1}".format(old_tablename,new_tablename))

    def add_column(self,tablename,columns):
        '''
        テーブル名を変更する

        Parameters
        ----------
        tablename : str
            テーブル名
        columns : str
            「列名」又は「列名+型」をカンマ区切りで指定
            <例> 'product text,price int,maker,year'
        '''
        sqls = []
        for column in columns.split(','):
            sqls.append("alter table {0} add column {1}".format(tablename,column))

        self.execute_all(sqls)

    def get_create_statment(self,tablename):
        '''
        指定したテーブルのCreate文を取得する

        Parameters
        ----------
        tablename : str
            テーブル名

        Returns
        ----------
        res:str
            Create文
        '''
        res = self.execute_scalor("select sql from sqlite_master where name='{0}'".format(tablename))
        return res

    def get_table_list(self,table_type=''):
        '''
        登録されているテーブルの一覧を取得する

        Parameters
        ----------
        table_type : str
            'table' => テーブルのみ、'view' => ビューのみ、'' => テーブルとビューの両方

        Returns
        ----------
        res:str
            リスト形式のテーブル名一覧
            <例>  ['talbe1','table2','table3']
        '''
        res = self.execute_query("select tbl_name from sqlite_master where type like '%{0}%'".format(table_type))
        return [name[0] for name in res]

    def get_column_type(self,tablename):
        '''
        指定したテーブルのカラムと型を一覧で取得する

        Parameters
        ----------
        tablename : str
            テーブル名

        Returns
        ----------
        res:str
            リスト形式でカラム名と型のタプルを返す
            <例>  [('column1','int'),('column2','text'),('column3',real)]
        '''
        res = self.execute_query("Pragma table_info('{0}')".format(tablename))
        return [(name[1],name[2]) for name in res]

    def get_column_list(self,tablename):
        '''
        指定したテーブルのカラム名を一覧で取得する

        Parameters
        ----------
        tablename : str
            テーブル名

        Returns
        ----------
        res:str
            リスト形式のカラム名一覧
            <例>  ['column1','column2','column3']
        '''
        res = self.execute_query("Pragma table_info('{0}')".format(tablename))
        return [name[1] for name in res]

    def vacuum(self):
        '''
        データベースの空き領域を解放する
        '''
        self.execute('vacuum')
import db.localdb as localdb
import log.logger as logger

#------------------------------------------------------
# 初期化処理
#------------------------------------------------------

#ログ機能
log = logger.Logger()
log.info(logger.Trace.execution_location(), '初期化処理')

try:
    #テーブル関連
    db = localdb.LocalCache('clipo.db')
    TABLE_EXEC_SETTING = "clipo_setting"
    TABLE_CSV_STATUS = "clipo_csv_status"

    #------------------------------------------------------
    # テーブル構築 初期化処理
    #------------------------------------------------------
    def init():
        #クリポ:テーブルがなければ作成
        if not db.exists(TABLE_EXEC_SETTING):
            this_table =   TABLE_EXEC_SETTING
            primary_key = 'id'
            create_ddl ='id text,\
                        clipo_url text,\
                        clipo_dirpath text,\
                        yahoo_userid text,\
                        yahoo_passward text,\
                        credit_card_last_digits text,\
                        security_code text\
                        '
            log.info(logger.Trace.execution_location(), 'テーブル作成:' + this_table)
            db.create(this_table,create_ddl,primary_key,isdrop=True)

        #クリポ:テーブルがなければ作成
        if not db.exists(TABLE_CSV_STATUS):
            this_table =   TABLE_CSV_STATUS
            primary_key = 'row'
            create_ddl ='row text,\
                        clipo_csv_post_code text,\
                        clipo_csv_address_1 text,\
                        clipo_csv_name text,\
                        clipo_csv_contents text,\
                        clipo_csv_status text,\
                        clipo_csv_row_data text\
                        '
            log.info(logger.Trace.execution_location(), 'テーブル作成:' + this_table)
            db.create(this_table,create_ddl,primary_key,isdrop=True)

except Exception as e:
  log.error(logger.Trace.execution_location(), '初期化実行エラー')
  log.error(logger.Trace.execution_location(), e)
  log.error(logger.Trace.execution_location(), e.reason)
配布用にexe化
windwos環境で、pyinstallerを使ってexeファイルを作成する方法です。
依頼主の環境にpython実行環境があることは稀です。
そのためPyInstallerでWindows用のexeファイル(実行ファイル)に変換して配布することになります。
※onefileを指定することでexeファイル1つにまとめることができますが、
容量が大きくなり実行が重くなる(初回起動は5秒くらいかかる感じ)場合があるので、その点は注意が必要です。
ただ、動かないと話にならないため、割り切るしかないかなと思っています。
docker run --rm -v "%cd%:/src/" --entrypoint /bin/sh cdrx/pyinstaller-windows -c "/usr/bin/pip install -r requirements.txt && pyinstaller app/src/main.py --noconsole --onefile --clean --icon=logo.ico && pyinstaller main.spec"
# -*- mode: python ; coding: utf-8 -*-

block_cipher = None


a = Analysis(['app\\src\\main.py'],
             pathex=['Z:\\src'],
             binaries=[],
             datas=[],
             hiddenimports=[],
             hookspath=[],
             runtime_hooks=[],
             excludes=[],
             win_no_prefer_redirects=False,
             win_private_assemblies=False,
             cipher=block_cipher,
             noarchive=False)
pyz = PYZ(a.pure, a.zipped_data,
             cipher=block_cipher)
exe = EXE(pyz,
          a.scripts,
          a.binaries,
          a.zipfiles,
          a.datas,
          [],
          name='main',
          debug=False,
          bootloader_ignore_signals=False,
          strip=False,
          upx=True,
          upx_exclude=[],
          runtime_tmpdir=None,
          console=False , icon='logo.ico')
まとめ
ちょっとした補助ツールとしては、とても使いやすいかと思います。是非、お試しください。
ここに記載していないことで、知りたいことがあれば、問い合わせフォームなどでご連絡頂ければ、分かる範囲でご回答します。